How to Use the Aerosol Spray Essential KitUpdated 5 months ago
Please follow the instructions below on how to use the Aerosol Spray Essential Kit for best results:
The Aerosol Spray Essential Kit includes
- Color
- Clearcoat
Please make sure to provide all other items listed in the instructions below.
BEFORE YOU START
Before any touch up paint project, always test your color with the included test card. Apply the color and clearcoat onto the test card using the directions below for painting and finishing. Compare the color applied on the test card against undamaged area of the vehicle. If the colors match, proceed with painting. Otherwise, contact us immediately.
Paint is best applied in temperatures around 70 degrees Fahrenheit. Do not apply in direct sunlight.
PART 1 - Prepare the Surface: Cleaning, Sanding, Taping, and Priming
Approximate time to complete*: 30-60 Minutes
What you need for PART 1:
- Soap and water
- Sandpaper
- Wax and grease remover
- Tape (optional)
- Primer
- Clean the entire vehicle or part with soap and water to remove surface dirt. Make sure to rinse and dry the surface thoroughly.
- Prepare the surface to be repaired using sandpaper (see Sanding Instructions).
- Clean again with soap and water. Then remove any remaining contaminants by lightly wiping the area with a wax and grease remover. We recommend the TUD Wax and Grease Remover Wipe.
- Tape off the area to be painted. This will help protect the area around the scratch when sanding or applying paint.
- Assess the exposed areas of the damage. You must apply a primer if the substrate is bare metal or plastic. We recommend TUD Aerosol Primer.
- If the area is already primed or not down to a bare substrate, you are ready to apply the first coat of color.
PART 2 - Paint the Surface
Approximate time to complete*: 30-40 Minutes
What you need for PART 2:
- Tack cloth
- Color (included in the Essential Kit)
Only proceed with PART 2 once PART 1 has been completed.
- Shake the aerosol can well. Periodically shake between each sprays.
- Remove any surface dust by lightly wiping the surface with a tack cloth immediately before the first coat. We recommend the TUD Tack Cloth.
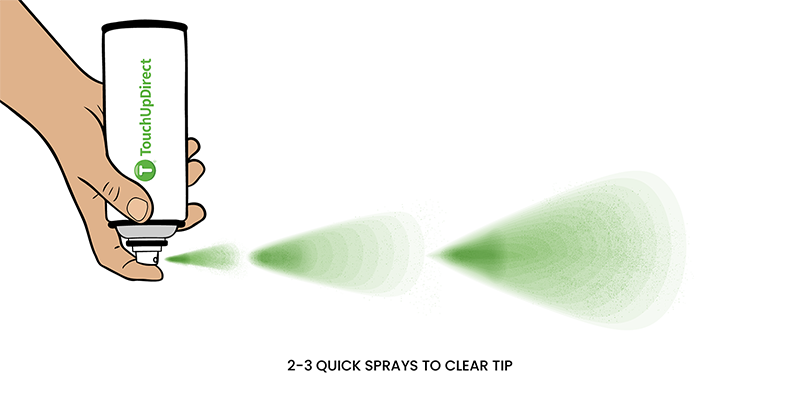
- The aim can be in a safe direction, away from anything that should not be painted. Test spray the can 1-2 times with a quick spray to clear the nozzle and ensure the can is functioning correctly.
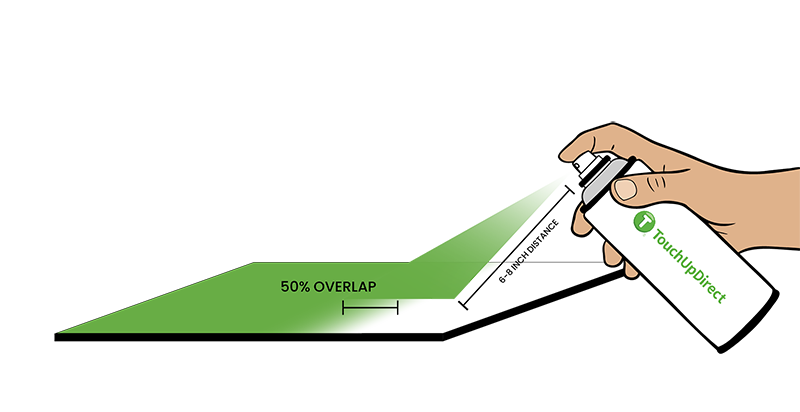
- Holding the can 6-8 inches from the face of the area to be painted, begin spraying your first pass 1-2 inches before the actual size is painted. Continue holding the spray trigger for 1-2 inches past the area to be painted.
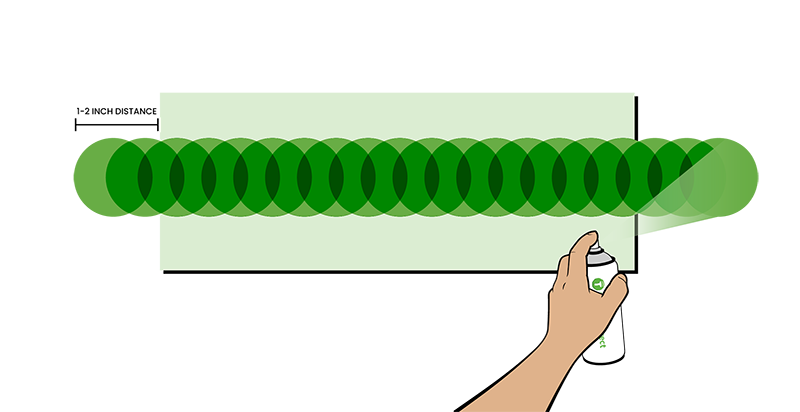
- Using the same technique as the previous pass, continue applying paint strokes until the surface is evenly covered. Overlap the last pass by 50% to ensure thorough coverage.
- Apply 2-3 coats using the same methods as steps 3 & 4. Let paint dry for 15-30 minutes between coats.
- Only if your color is a Tricoat, repeat step 6 using the applicator labeled “Midcoat, for 2-3 coats. Let the paint dry for 15-30 minutes between coats.
- When finished, aim the can in a safe direction, hold the can upside down, and spray 2-3 quick bursts to clear the nozzle.
PART 3 - Finish the Surface
Approximate time to complete*: 30-45 Minutes
What you need for PART 3:
- Tack cloth
- Clearcoat (Included in Essential Kit)
Only proceed with PART 3 once PART 2 has been completed. You should now have 3-4 coats of color applied and dried for over 30 minutes.
- Shake the clearcoat aerosol spray well. Periodically shake between sprays.
- Use a tack cloth immediately before the first coat and all additional coats. Apply a light, even coat of clear coat. The first coat should be light and have thorough, even coverage. Allow drying for 15-30 minutes.
- Apply another coat, which can be heavier than the first coat. However, be careful not to apply so heavily that it creates runs. Allow drying for 15-30 minutes.
- Repeat Step 3 for up to 4 coats, allowing time to dry between applications. Stay under four coats.
- Clearcoat will be dry enough to handle within 30 minutes after the last application. Allow drying for a total of 48 hours before wet sanding, polishing, or waxing.
* Actual implementation times may vary